July 29, 2012

Sunday S'mores: S'mores Whoopie Pies


It's almost time for the August session of Camp NaNoWriMo! In case you've forgotten, I started Sunday S'mores as a way to celebrate Camp NaNo in June. And then real life turned into a total suckfest. To tell you the truth, I only got about 2000 words written in June (out of the 50,000 I was supposed to write).

It's tough, because I'm not as excited as I usually am for anything NaNoWriMo. You haven't really known me during a session of NaNo. I love it. There's nothing like it. Camp's a little more laid back than the regular session (which is probably why I've never won a Camp session), but you can still find me chanting, "Write or Die!" or spouting Baty-isms (my favorite goes something like, "For every word you delete, a NaNoWriMo angel plummets, screaming, to the ground where they will most likely require medical attention." We're a special breed).

But as August gets closer, I find myself feeling an unusual trepidation. Because I can't help thinking "if." If I hadn't fallen behind in my wordcount... If I had written 1,667 words on day 1 instead of procrastinating... If I'd plotted out the story beforehand... Logically, I know that it wouldn't have made any difference, but it still haunts me.
So, since it's the last weekend before Camp, I made whoopie pies, because whoopie pies make everything better, right? Whoopie pies are going to fix everything.

I made up the recipe for the cakes, and to my surprise, they really do taste like graham crackers, except fluffy and moist. Then I whipped up some of my no-fail marshmallow filling, and used the fudge sauce I had left over from last week.
I don't know why some people use whoopie pie pans and a pastry bag for the filling. I always thought that half of the charm of a whoopie pie is it's rustic look. But of course, that could be because the first time I had a whoopie pie was at an Amish farmer's market. There's a lot of beauty in imperfection.

S'mores Whoopie Pies {Printable Version}
Yield: 17 whoopie pies (34 individual cakes)
 
Ingredients
1 cup whole wheat flour
1 cup all-purpose flour
1 tsp. baking powder
½ tsp. ground cinnamon
½ tsp. salt
½ cup (1 stick) unsalted butter
½ cup solid white vegetable shortening (Crisco)
1/3 cup packed brown sugar
1/3 cup granulated sugar
2 eggs
1 tsp. vanilla
2 tbsp. honey
2 tbsp. milk
1 recipe Marshmallow Whoopie Pie Filling
Approx ½ cup fudge sauce


Directions
Preheat the oven to 350°F. In a large mixing bowl, combine flours, baking powder, cinnamon, and salt.
Set aside. In the bowl of a stand mixer beat the butter, shortening, and sugars at medium speed until
fluffy. Add the eggs and vanilla, beating well after each addition. Add about half of the flour mixture to
the butter mixture and beat on low until just combined. Mix together the milk and honey and add to the
batter. Add in the rest of the flour mixture and beat on low until smooth.


Line a cookie sheet with parchment paper or a silpat mat. Drop the batter by the tablespoonful on the
cookie sheet, leaving at least one inch between each. Bake for 9-10 minutes, or until the cakes spring
back when lightly pressed. Cool completely on wire racks.


Sandwich the fudge sauce and filling between two cakes and serve.


Recipe by Kim


Food Holiday Link Party

July 26, 2012

Fiesta Pasta Salad


Today I'm revealing my not-so secret ingredient. I put this stuff on nearly everything savory. I use it to jazz up my tuna salad, add it to every dry rub I make, use it in soups and stews. For a while I considered keeping a bottle of it in my purse so I could even use it in restaurants.

It's Mrs. Dash.

Completely dumbfounding, right? I hate things that are salty (except for things that are supposed to be salty, like pretzels and feta), so if something's bland, I'm not going to reach for the salt shaker. I'd generally take bland over salty any day. But with Mrs. Dash, I don't have to make that choice. (That sounded like a good tag line for a commercial, right? Hey, Mrs. D, have your people call my people. We'll do lunch.)

It was a product that my nutrition-savvy aunt found years ago, and our family has been using it since before it really entered the public sphere. We used to have to hunt for it in stores; now you can find it in every grocery store in a mind-boggling array of flavors. I recently decided to try out the Fiesta Lime flavor. Hoo boy, was that a good idea.
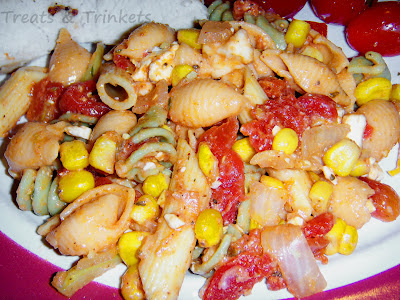
 I feel like I've crossed some line into official foodie bloggerdom: I photographed my dinner plate

This pasta salad was originally up food. My brother was grilling something, and nobody knew what to make with it, and nobody much felt like going to the store. And I was all, "why not just make pasta salad?" Of course, that meant that I had to make the pasta salad, and it was kind of a found-object dish. I grabbed a box of tri-color pasta, a can of tomatoes, a can of corn, and onion, and a bunch of spices (including Mrs. Dash Fiesta Lime). And, don't laugh, I chopped up a couple sticks of string cheese, because I wanted to add cheese. My mother fell in love with it and declared that I had to make it for the annual family barbecue.

Knowing what to do now, I added some bell pepper and a little bit of salad dressing to keep it from drying out. And I used a pre-packaged block of mozzarella.

I know what you're thinking. Trust me, I know. I'm Italian. But the pre-packaged kind is firmer, and the cheese is going to soak up the flavors of the pasta salad anyway. This is the only time you will ever hear me recommend using it over fresh, but you are better off in this one instance. (Note: you can also make it with feta; I did both and preferred the mozz, but the feta is still pretty tasty.)
Oh, and that 28 oz. can is not a typo. Italian households tend to have very large cans of tomatoes around the house. You can always sub two smaller cans if you prefer. Or one smaller can if you want less tomatoes. I don't care. Really.

Fiesta Pasta Salad {Printable Version}
Yield: 6-8 servings
Ingredients
1 box (16 oz.) tri-color pasta
1 28 oz. can diced tomatoes, drained
1 15.25 oz. can corn, drained
1 large bell pepper, julienned
1 medium onion, chopped
8 oz. mozzarella, cut into bite-size pieces
2 tbsp. Italian flavored dressing (I used sun-dried tomato and basil flavored)
1 tbsp. Mrs. Dash Fiesta Lime seasoning blend
1 tsp. garlic powder
1 tsp. dried oregano
½ tsp. dried basil
Sea salt and freshly cracked black pepper, to taste


Directions
Cook the pasta according to the directions on the box. Drain and rinse with cold water. Place in a large serving bowl. Mix well with remaining ingredients. Cover and refrigerate minimum 2 hours. Serve chilled.

Tip: Salt the boiling water for more flavorful pasta. I usually cook the pasta 1-2 minutes less than the shortest cook time on the box because I prefer it more firm.


Recipe by Kim

July 22, 2012

Sunday S'mores: S'mores Icebox Cake


I'm worn out, you guys. It's the job, mostly. Long hours with hardly a break, mostly alone save for what often seems like the dregs of humanity that call in whining about how they need to speak to a live person and it's urgent and couldn't I just waste my time calling everyone until I find someone who answers? Or leave the phones and go see if that person's at their desk? Because it isn't like I answer the main line for a very large company or anything, and their's must be my most important call of all time.

Now they've got me whining too.

I vote we make weekends three days instead of two. Because it never seems like there's enough time in the weekend. I can relax and do stuff that I need to, but don't have time to do anything fun. I can relax and do something fun, but stuff I need to do gets put on the back burner. I can do something fun and stuff I need to, but I don't have anytime to relax. Three days would be perfect.
How pretty is this cake? I'm very proud.
So when Sunday S'mores time rolled around again, I knew it had to be something simple and fun to lift my spirits without wearing me down. I could have sworn that I had pinned a s'mores icebox cake on Pinterest, and that sounded like exactly what I needed. I'd never made an icebox cake before, so it would be fun to try, and from what I knew of them, they sure sounded easy enough.

So I went on my s'mores board... and it wasn't there. I had imagined it. So I did some research on icebox cakes and came up with my own. I made it in a loaf pan, since that seemed to be the most common method, but I also made a freeform one, in case the other didn't turn out.
Freeform version
I made some marshmallow whipped cream (although I could have used my toasted marshmallow mousse, I didn't feel much like heating the broiler) and my favorite fudge sauce recipe from Betty Crocker. I made my own sauce because I knew that this recipe was nice and thick (and I had all the ingredients on hand), but you could easily use jarred fudge sauce (which I didn't have on hand).
 As I said, I'd never made an icebox cake before. Nor had I eaten one. But now that I have done both, I'm completely astonished that everyone doesn't make them constantly. Graham crackers, whipped cream, and fudge sauce spend the night together in the refrigerator and somehow becomes cake. I have to admit, I was a little nervous about texture since the whole point of this cake is to make the graham crackers mushy, but it's a good mushy. Firm like a cake, but soft enough to slice. It reminds me a little of a half-melted ice cream cake.
The flavor is pretty much what you would expect. Graham crackers, fudge sauce, and marshmallow whipped cream (though I will admit that the marshmallow gets a little lost. Oh well, I was lazy).

I also topped it with some S'mores Sprinkles by Duff. I completely forgot I had those suckers until now, and they add a real nice sweet crunch.
So to sum up, icebox cakes are super yummy, super easy, no-bake, and only as complicated as you choose to make them. Seriously people, make more icebox cakes.

S'mores Icebox Cake {Printable Version}
Yield: 8-10 servings

Ingredients
1½ cups whipping cream, chilled
1 cup prepared marshmallow topping or crème (Fluff)
1½ tbsp. sugar
½ tsp. vanilla
Approx. 2 sleeves of graham crackers (18 sheets or about 72 individual)
Fudge sauce
Sprinkles or crushed graham crackers, to decorate

Directions
Heat the marshmallow topping in the microwave for a few seconds, until it can be drizzled from a spoon.
Set aside. In the bowl of a stand mixer, or in a large mixing bowl with electric beaters, whip together the
whipping cream, sugar, and vanilla on high speed until soft peaks form. Reserve about ½ cup of the
whipped cream and carefully fold the marshmallow topping into the remaining cream.

Line a loaf pan with plastic wrap. Spread the reserved whipped cream evenly in the bottom of the loaf
pan, about ¼ inch thick. Place a row of graham crackers over the whipped cream, filling as much space
as possible. Heat the fudge sauce to spreadable consistency if necessary and spread a thin layer over the
graham crackers. Top with another layer of graham crackers and spread with the marshmallow whipped
cream. Repeat, alternating between the fudge sauce and whipped cream until the top of the loaf pan is
reached, ending with the whipped cream. Refrigerate overnight.

Invert the loaf pan over a serving dish to release the cake (it should pop right out). Frost the sides with
the remaining whipped cream, if desired, and drizzle with fudge sauce. Top with sprinkles or graham
cracker crumbs. Serve chilled.

Tip: You can also make a freeform cake. Just line the serving dish with graham crackers and layer from there (no need to reserve plain whipped cream).

Recipe by Kim

Pretty cake is pretty. XD

July 18, 2012

Lemon Slices


Every so often, even the most adventurous cook will come across a recipe that even they don't think is worth it. It's generally a recipe that they made once and was so tempermental and fussy that they don't ever plan on making it again. For me, these cookies were one of those recipes. I got a bit manic after my grandmother died and was up baking cookies past midnight the day before the wake. I had lemons, so lemon cookies were one of the things that I made.

These were a make-ahead slice and bake recipe, so I whipped up the dough and managed to get a few hours of sleep before putting the first batch in the oven, and I took out something that couldn't be seen in all three dimensions. They spread like crazy. I had to pull out every trick in the book (and quite a few cookie-baking no-no's) to get cookies that weren't see through.

Once I managed to get something that actually resembled a cookie, they were actually pretty good. I'm a fan of citrus, and these had a nice strong lemon flavor. They weren't very sweet, so I mixed up a lemon glaze, and that put them over the top into awesome lemon cookie territory. Still, they were quite the pain in the derriere, so I figured that would be the first and last time I ever made them.

Sorry for the picture quality. I was running out the door.
Except that these cookies ended up being a huge hit, and my Aunt Ida, my grandmother's sister who just happens to be one of the best old broads you ever did meet, specifically asked that I make them for the family barbecue. So I did what I could to tweak the recipe, decreased the baking temperature, used rimmed baking sheets, and baked them on the lower rack of the oven. They still spread pretty thin, but at least they didn't disappear when you look at them from the side.

And knowing the way that food disappears in my family, I made sure to set aside a plate just for Aunt Ida, which she guarded ferociously from all passers-by. My dad says I'm most definitely in the will, now.

Lemon Slices {Printable Version}
Yield: Approx. 5 dozen cookies

Ingredients
For the cookies:
2¼ cups flour
½ tsp. baking powder
¼ tsp. salt
¾ cup powdered sugar
½ cup granulated sugar
½ cup unsalted butter, at room temperature
¼ cup solid white vegetable shortening (Crisco)
Zest of 1 lemon
2 tbsp. lemon juice
½ tsp. vanilla

For the glaze:
2 cups powdered sugar
4 tbsp. lemon juice
Milk

Directions
In a medium bowl, mix together flour, baking powder, and salt. In the bowl of a stand mixer, cream the butter, shortening, sugars, and lemon zest together until fluffy. Add the lemon juice and vanilla and mix well. Beat in the flour mixture at low speed until just combined. Divide the dough in half. Shape each half into logs about 6 inches long and wrap them in plastic wrap. Refrigerate overnight.

Preheat the oven to 325°F. Line a rimmed baking sheet with parchment paper. Working with one log at a time, cut slices about ¼ inch thick, and place them 2 inches apart on the baking sheet. Bake on the lower rack for 12-13 minutes, until the edges are golden brown. Let cool on the baking sheets a few minutes before transferring to wire racks.

For the glaze: Mix together the powdered sugar with the lemon juice and just enough milk to achieve a good spreadable consistency. Spread onto the cooled cookies and let dry before serving.

Tip: Make sure the dough you’re working with is chilled and firm. If one log gets too warm, put it back in the refrigerator and work from the second one. I alternate between the two for each batch. Also, the baking sheets have to be completely cooled before using. For added insurance, chill each batch in the refrigerator on the baking sheets as the batch before it is baking.

July 16, 2012

Sunday(Monday) S'mores: S'mores Mud Pie


Does anyone else see the face? It amuses me.
 It's Sunday S'mores! On a Monday. Thought I would shake things up a bit. Okay, actually this is not what I was going to post for this week's Sunday S'mores. It was supposed to be a brownie s'mores pie with a layer of ooey-gooey toasted marshmallows on top. But this weekend was the annual family barbecue at my Uncle Hugo's house in Brooklyn and I made lemon cookies for Aunt Ida and pasta salad and we went and played volleyball in the pool and ate copious amounts of Aunt Sophie's potato pie and bet on the kids racing horses...

Not real horses. Wooden horses. See there are six of them, and the back patio is made up of all these blocks, so we roll three dice and the horses that are chosen move up a block. And then there are hurdles (brooms, or Bella the dog as she generally chooses to lie down in the middle of the "racetrack") that you need a double to get over. And we bet in quarters and Kevin does the odds...

It's one of those traditions that loses something in the translation.
So this weekend was kind of busy, and a little emotionally wrought as it was the first real family gathering without my grandmother, and I hadn't had anything planned for Sunday S'mores come Sunday. I was going through my cookbooks and came across a recipe that I would have sworn would be a sure bet. It was a brownie pie from a Betty Crocker cookbook. Simple recipe, basic ingredients, I'd just swap out a graham cracker crust for the pastry one, and broil some marshmallows on top. Easy-peasy, right?

Wrong

If you follow me on Facebook, then you already know that the recipe had far too much batter for the regular 9 inch pie plate it called for. But my troubles started before that. I first made way too much graham cracker crust (not the worst problem, but I should have been wary after that). I'm not much of a nut fan, so I added two cups of chocolate chips rather than the one cup plus one cup chopped nuts and immediately saw that it was far too much, which only exacerbated the excess batter problem. Then, as I was dishing the batter into the plate, I saw that I had done a crap job of mixing in the flour; there was maybe 1/2 cup of dry flour at the bottom of the mixing bowl. I tried to hurriedly mix it in to the remaining batter, which is probably why I wasn't paying as much attention as I should have to how much I was dishing out.

Not one to be discouraged, I placed it in the oven, and half an hour in to the 45-60 minute cooktime, the smoke alarm started blaring because the pie had overflowed and batter was burning on the bottom of the oven.

So brownie pie=epic fail.
But I had the extra graham cracker crust, so I figured I would persevere. Just, not with anything baked, because I had to wait for the oven to cool so I could scrub off the burned batter. So I thought, how about a marshmallow mouse pie? Toasted marshmallows, whipped with whipping cream and vanilla, fold in some chocolate shavings and drizzle with chocolate. Except I only had half a bag of marshmallows, and that didn't make enough for a pie (you'll notice in the recipe that I tell you to use a full bag; that's because the marshmallow layer was still a bit thin for me).

Then I remembered that I had some chocolate pudding mix in the pantry. I poured chocolate pudding over the marshmallow, chilled it for a couple hours, and had Sunday S'mores ready for Monday. What're you gonna do, eh?

S'mores Mud Pie {Printable Version}
Yield: 8 servings

Ingredients
For the crust:
1 ½ cups finely crushed graham cracker crumbs
5 tbsp. melted butter
3 tbsp. brown sugar

For the filling:
1 pkg. (10 oz.) marshmallows
1 cup heavy cream, chilled
2 tbsp. sugar
1 tsp. vanilla extract
1 pkg. chocolate instant pudding mix (plus ingredients on box)

Directions
Prepare the crust: Preheat the oven to 350°F. In a mixing bowl, mix together graham cracker crumbs,
brown sugar, and melted butter. Press the crust mixture evenly into a 9 inch pie plate, allowing it to
come up the sides. Bake 6-8 minutes, until the crust is fragrant and the edges start to brown. Cool
completely on a wire rack before filling.

Prepare the filling: Place the marshmallows on a baking sheet lined with tin foil, and place them under
the broiler for about 30 seconds, until the marshmallows are a dark golden brown and have just started
to smoke. Carefully flip the marshmallows over and repeat on the other side. Add the toasted
marshmallows to a blender with ½ cup of the heavy cream and pulse a few times until smooth. If the
mixture is still warm, chill it in the refrigerator 30 minutes to 1 hour, or until completely cooled.

Add the remaining heavy cream, sugar, and vanilla to the bowl of a stand mixer and whip on high with
the whisk attachment until soft peaks form. Add the marshmallow mixture and whip on high until stiff.
Spread evenly into the prepared crust.

Prepare the pudding according to the directions on the box. Pour the pudding on top of the
marshmallow mousse, being careful not to overfill the pie plate. Cover in tin foil and refrigerate 4-6
hours, or overnight. Or freeze for 4 hours. Can be served chilled or frozen.

Recipe by Kim

July 11, 2012

Peanut Butter Banana Bread Smoothies


I'm going to tell you a love story. It will beat any love story you've ever heard before. The Notebook? Forget it. Romeo & Juliet? Please. Pride & Prejudice? C'mon. This is the purest, most wonderful love story in all the land.

This is the story of the love one girl has for peanut butter.

Oh, you're so hooked now, right?

When this girl was little, she didn't like peanut butter. In fact, she hated it. When the teachers would ask if anyone was allergic to peanuts, she would raise her hand. She didn't really know what allergic meant, but she knew if she said she was allergic, she wouldn't have to eat it. She was a pretty smart kid, and I can say that totally and completely objectively.

But peanut butter was patient, for it knew that they were destined for a love like no other. It stayed close and waited until one day the girl tried it again and found that she did like it. But not only did she like it, she came to love it. She loved it more than ponies, more than cheese, maybe even more than rainbows, but that is unconfirmed. She'd rarely even eat chocolate without the addition of peanut butter.

This might seriously be my new favorite song

As the girl grew older, she and peanut butter grew into a comfortable sort of love. She knew that peanut butter would always be there when she needed it. In fact, when she was in college, she would spend many a night alone with it; just her, peanut butter, and a spoon. And she would call it dinner, you perverts.

Then when the girl graduated, she started to bake. And blog. And she discovered something amazing called Peanut Butter & Co. And she fell in love with peanut butter all over again, for this company had varieties like Dark Chocolate Dreams and White Chocolate Wonderful, and her newest discovery, Cinnamon Raisin Swirl.

The girl would have preferred Cinnamon Raisin Swirl without the raisins, since she'd never been much of a fan, and found them a little odd in the peanut butter, but she knew it would make a killer banana bread. Except temperatures had been reaching the hundreds and it was just to darned hot to bake. So the girl turned that killer banana bread into something cool and almost healthy: a smoothie.
Peanut Butter Banana Bread Smoothies {Printable Version}
 Yield: 4 smoothies

Ingredients
3 medium ripe bananas, chopped and frozen*
1½ cups cold vanilla soy milk
¾ cup Cinnamon Raisin Swirl peanut butter (or ¾ cup creamy peanut butter plus 2-3 tsp. cinnamon)
2 tbsp. brown sugar or Splenda Brown Sugar Blend
Pinch salt

Directions
Add all ingredients to a blender, and blend until smooth. Serve immediately.

*Smoothies are a great way to use bananas that are about to go bad. Peel and chop before freezing and seal in a zip-top bag. Freeze for a minimum of two hours. Keeps in the freezer indefinitely.

Recipe by Kim

Please note that I am in no way affiliated with Peanut Butter & Co. They have not paid me, sent me free samples, or asked me to review their products. They just happen to manufacture a product that I truly enjoy.


July 8, 2012

Sunday S'mores: Easy S'mores Pudding Pops


I have a confession to make. I wasn't sure if I would have anything ready for Sunday S'mores this week. I wasn't feeling great the last couple of days, and it was getting to the point where I was thinking that I might just share some s'mores-themed recipes that I'd been collecting across the interwebz.

Inspiration finally hit last night when I was eating the last of the toasted marshmallow ice cream. What about pops? I thought. I could do like a graham cracker crust, and I have some hot fudge in the refrigerator. And hey, wouldn't it be great with some of the marshmallow ice cream? Look down at the empty bowl in my hands. Oops. Well I've got some marshmallows and some instant pudding. That might work instead.
I used some silicone baking cups that I had gotten for Christmas as the molds, and let me tell you- they worked beautifully. They kept their shape and I was able to pop the pops (heh) out super easily.
These were thrown together last minute last night, so when I call them easy, I really mean easy. Plus, the graham cracker crust and gooey fudge surprise in the middle make them seem elegant and decadent and not at all like something that you threw together 10 minutes before bedtime, so that's always a plus.

Before I share the recipe with you, there's something else. Kayle, aka The Cooking Actress, awarded me with the Addictive Blog Award!
 
I'm not sure that Kayle's read her own blog, because I hardly think of this as addictive compared to her's! But thank you, thank you, thank you, THANK YOU!!!!

Here are the rules:
1. Thank the person who nominated you and link back.
2. Share a little bit about why you started blogging.
3. Copy and paste the award to your blog.
4. Nominate 10 other Addictive bloggers and let them know!
Why did I start blogging? Mostly to see if I could. And to do something constructive with all of the baking I'd been doing.

The nominees are:
  1. Jen from Juanita's Cocina
  2. Heidi from Young Grasshopper
  3. Jennie from The Messy Baker
  4. C.J. from Food Stories
  5. Choc Chip Uru from Go Bake Yourself
  6. Brianne from Cupcakes and Kale Chips
  7. The Squishy Monster
  8. Arva from I Live in a Frying Pan
  9. Megan from domestic diva, M.D.
  10. Amy from Oh, Bite It!
Easy S’mores Pudding Pops {Printable Version}  

Yield: 12 cupcake-sized pops

Ingredients 
For the crust: 
1 ½ cups finely crushed graham cracker crumbs 
5 tbsp. melted butter 
3 tbsp. brown sugar

For the pops: 
6 tbsp. fudge sauce 
Approx. 72 mini marshmallows 
1 pkg. vanilla instant pudding mix (plus ingredients on box)

Directions 
Prepare the crust: in a mixing bowl, mix together graham cracker crumbs, brown sugar, and melted butter.
Spoon a small amount of the crust into each pop mold* and press it down evenly, allowing a small amount to come up the sides. Heat the fudge sauce to spreadable consistency and spoon 1 ½ tsp. into each pop mold, spreading it to fill the prepared crust. Add about 6 mini marshmallows to each pop mold.

Prepare the pudding mix according to the directions on the package. Before it starts to thicken, distribute it evenly between the molds, being careful to leave at least ¼ inch from the top. Tap the molds gently to get rid of air bubbles. Add lollipop sticks, making sure to push them to the bottom of the mold so the graham cracker crust holds it in place. Freeze 2 hours, until the top has hardened.

Remove the pops from the freezer and press the remaining crust evenly on the top of each pop. If the crust isn’t sticking, let the pops sit at room temperature for a minute or heat the crust mixture for a few seconds in the microwave. Freeze for 4 hours.

*I used silicone baking cups as my molds, and that influenced my measurements. Any sort of wide-mouthed mold works well for these pops, including plastic cups, but you may have to adjust your ingredients accordingly.

Recipe by Kim

July 1, 2012

Sunday S'mores: Red White & Blue S'mores Sundae

With Toasted Marshmallow Ice Cream and Red Velvet Graham Crackers


Do you ever get ideas into your head that you think have to be either the best idea you've ever had, or is just plain weird? And it's either/or, absolutely no in between. This was one of those ideas.

I'd been doing a little research into toasted marshmallow ice cream. I was thinking of doing an ice cream sandwich with homemade graham crackers when it hit me that the fourth of July was almost here, and I should do something fourth-themed. I thought maybe I could just color the graham crackers red, when I remembered that I had a bottle of red velvet emulsion, and I thought, well, what about red velvet graham crackers? I adapted this recipe for chocolate graham crackers from King Arthur Flour, and it was good. I mean, really good. Really, really good. Like, I think I've already eaten 10 this morning good.

As for the toasted marshmallow ice cream, I couldn't find a specific recipe that I liked, but they all seemed to add toasted marshmallows to a custard base. So I made Sweet Cream Base #1 from my Ben & Jerry's Homemade Ice Cream & Dessert Book (Ben & Jerry will never let you down), blended it with some toasted marshmallows and a little vanilla, and added in some milk chocolate chunks. And that was good, too, but not quite as marshmallow-y as I wanted. However, I think the problem was that I only toasted one side of my marshmallows. Also, that I ate two. Maybe three. You shouldn't do that.
Now, I know what you're thinking. "Didn't she say she wanted to make ice cream sandwiches?" you're saying with complete bewilderment. "That doesn't look like a sandwich to me!" And you would be completely right. I was planning on making ice cream sandwiches. And I did. But, um....they weren't pretty. So instead, I gave you a s'mores sundae for your Sunday S'mores (okay, truth: it took me like 10 minutes after writing the title to get that. And I even misspelled sundae as Sunday). Live with it.

Before you go, I'd like to thank Jordyn from A Jew Broad Cooks for my Foodie Penpals package:
We all know that June was a tough month for me, so it was an awesome surprise to find this on my doorstep. I tore into those chocolate almond crispies as soon as I opened the box, and I used that honey to make my graham cracker marshmallows. The hazelnut butter is long gone, and I ice that Tazo tea to drink at work. Totally refreshing. I'm sure I'll be cracking into that Old Bay before too long. Thanks again, Jordyn, and go check out her blog! She's fabulous.

Red Velvet Graham Crackers {Printable Version}
Yield: 30 2-inch square crackers
 
Ingredients
1 cup packed dark brown sugar
3/4 cup whole wheat flour

1/2 cup all-purpose flour
1/2 cup unsweetened cocoa powder
1 tsp. baking powder
½ tsp. salt
6 tbsp. cold unsalted butter

2 tbsp. solid white vegetable shortening (Crisco)
2 tbsp. honey
1 tbsp. cold milk
1 tbsp. red velvet emulsion or red food coloring*
2 tbsp. granulated sugar, for sprinkling


Directions

Preheat the oven to 325°F. In a large mixing bowl, mix together the dry ingredients. Using a pastry
blender, cut in the butter until well mixed and crumbly. In a small bowl mix together the wet ingredients
until the honey is dissolved. Sprinkle over the dry ingredients, and mix with a fork until a dough forms.
Add more milk, if necessary.


Press the dough into a ball, and turn out onto a lightly floured surface. Knead gently about 10-12 times.
Roll out the dough no thicker than ¼ inch. Cut into even shapes using a cookie cutter, sharp knife, or
pizza cutter. Place on a cookie sheet lined with parchment paper or a silpat mat and bake 12-15
minutes, until the dough is no longer bubbling and the edges are firm. Sprinkle with granulated sugar
immediately after removing from the oven, and let cool completely on a wire rack.


*This is to make the crackers softer. Feel free to use all butter, if you prefer.

**For chocolate graham crackers, replace the emulsion with another tbsp. of milk.

 
Recipe adapted from King Arthur Flour 


Toasted Marshmallow Ice Cream {Printable Version}

Ingredients
1 pkg. (10 oz.) marshmallows
2 eggs
¾ cup sugar
2 cups heavy cream
1 cup milk
1 tsp. vanilla extract
6 oz. milk chocolate chunks (optional)

Directions
Place the marshmallows on a baking sheet lined with tin foil, and place them under the broiler for about
30 seconds, until the marshmallows are a dark golden brown and have just started to smoke. Carefully
flip the marshmallows over and repeat on the other side. Add the toasted marshmallows to a blender
and pulse a few times until smooth.

In a medium mixing bowl, whisk together the eggs and sugar until fluffy. In a medium saucepan, heat
the cream and the milk over medium-low heat until it just begins to simmer, stirring occasionally.
Remove from heat. Add the milk mixture to the eggs 1 ladleful at a time, whisking constantly. When all
the milk has been added, return the mixture to the pan and heat over low, stirring constantly, until the
mixture reaches 160°F on a food-grade thermometer. Do not let it boil.

Add the cream mixture to the blender, and blend on low speed for 30 seconds to 1 minute, or until the
cream and marshmallows are well mixed and smooth. Add the vanilla and pulse a few times until fully
incorporated. Refrigerate the mixture for 4-6 hours, until completely chilled. Add to an ice cream maker
and freeze according to the manufacturer’s directions. When the ice cream is almost finished, add the
chocolate chunks, if desired.

Recipe adapted from Ben & Jerry’s Homemade Ice Cream & Dessert Book